вторник, 19 марта 2013 г.

Google stats

It's fun to note that the most popular Google search request that leads to my blog is: 'is way to copy and'.

I cannot even imagine why would anyone with clear mind search for this phrase and click on git blog. But, according to Google Statistics, if somebody made his way to my blog from Google, then it's three times more probable he searched for 'is way to copy and' than for my main target 'git explained visually'...

четверг, 10 января 2013 г.

Git: cherry-pick vs rebase

When to use cherry-pick and when to use rebase?

Cherry-pick is a tool to merge a single isolated commit into your current branch.

Consider an example. Here we have two branches: master and topic-test. Our current branch is master.


If we happen to cherry-pick "change 2" commit, we are going to get only the changes introduced by "change 2" commit but not "change 1" commit because cherry-picking ignores history.


Rebase is way to "copy and paste" all commits from other branch on top of your current branch. Rebasing "change 2" above master results in:


Please note the difference: now the whole history was merged.

Both of theese operations are merges, so they both can result in conflicts which have to be resolved before continuing. Rebase processes one commit after another, so can result in many tiers of conflicts. 

вторник, 24 июля 2012 г.

Git commit, merge, rebase, cherry pick, octopus explained visually

Lets create an empty repository and make one commit.

As we had previously seen, this results in
Lets zoom in and see what happens in a bucket when we commit, merge and rebase.

It is important to understand that a commit corresponds to a whole repository state, not only to files that were included in commit. This would be important later as we experiment with checkout operation: checking out a commit means checking out all files in a repository to a state they were at the time of this commit.

You can think of this as if all your documents in repository are being compacted to a ball every time you make a commit, like on this picture:
Lets introduce a concept of a branch. Branch is just a pointer to a specific commit, nothing more. In git, we always have at least one branch. This default branch is called simply 'master', so, if we zoom in into our bucket, we see:


If we make another commit, the branch pointer is automatically moved to point to our newly created commit

The link between commits A and B means that commit B depends on commit A.

Once again, if we commit even more:
Just because branch is a simple pointer, you can always move this pointer around. This operation is called reset. Here is how reset works:
After this operation you get a repository state as it was at the moment of commit B. We can always return back. It is important to understand that you get all your files to the state they were at the time of commit B, not just files that you actually had in commit B. If you reset back to commit C, you get familiar picture:

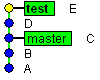
One branch is not much fun, so lets create another one. Remember that branch is a simple pointer. We can create branch to point to absolutely any commit in history (including the commit you made three days ago, not just new commits). Lets create a branch that points to commit B.


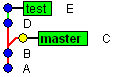
Notice that bold font marks our current branch, the branch that we actually have checked out on disk. Lets switch to branch 'test'. This operation is called check out.


Lets make some changes and commit them.

And once more:


Oh, we'd like to have our changes from commits D and E in branch 'master'. The are three ways to achieve this: merging, rebasing and cherry-picking.

Lets look at merging. Lets merge our test branch to master.

First, git only supports merging to our current branch, so we need to check out branch 'master':

Master is bold: this means active branch

We already know that in git, commit corresponds to a whole repository state. So as you can guess any merge results in a new commit which corresponds to merged repository state:

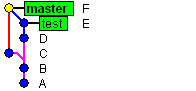
'F' is a merge commit
The are two special cases of merge: octopus merge and fast-forward merge. When you merge multiple branches into one branch with a single operation, this is called an octopus merge. It helps to merge for example branches test1, test2 and test3 into master in one operation:

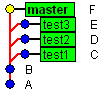
Before octopus merge
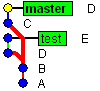
After octopus merge of test1, test2, test3 into master (notice how 'Merge' commit now depends simultaneously on F, E, D, C commits):
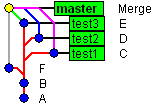
After octopus merge

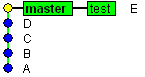
Fast-forward merge is not a merge actually as it just helps to get changes from some other branch in case there were no other commits done in our branch since we've branched:

Before fast-forward merge
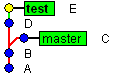
The 'master' branch pointer is just moved to point to the same commit branch 'test' points to:

After fast-forward merge

Rebases are a bit different way to join two branches: it just places all valuable commits from branch test 'over' branch 'master'. Have a look:

Before rebase

Notice how E, D commits are now based on commit C. Thats why the operation is called 'rebase': because it just takes interesting commits and changes the commits they were based on:

After rebase
Cherry-pick is a special case of merge designed to merge a single commit to our current branch. Lets cherry-picking commit D into master. Here is how it looks like:

Before cherry-picking
Please note, that commit D gets duplicated (is twice in history, this is not an editor error):

After cherry-picking
Hope this was an interesting reading.

среда, 14 марта 2012 г.

Learning git via magic buckets and balls

Here is a simple way to understand git basics. Lets imagine two persons start working on some project.

Alice first creates empty repository and starts working on it. A repository can be thought of as a bucket with commits.

An empty repository looks like:
Alice continues to work, creates\edits files and makes a commit. Commit can be thought of as a ball placed in a bucket.
Each commit is a ball put in a bucket. Here is what happens when Alice makes second commit.


Time for Bob to appear. He also works and makes balls, but in his own repository. Bob's balls are green. He makes three commits.

Now Alice wants to get Bob's work in her repository. This operation is called 'pull' if is performed by Alice, and 'push' if performed by Bob. Easy to remember: push is an operation to share _YOUR_ changes, pull is an operation to get other persons' changes from remote repository. From intuitive point of view, pull and push are not two different operations, this is one operation called differently depending on the order of application. When Alice pulls from Bob, this is basically the same as if Bob pushes to Alice.

Here is how it looks like with magic buckets:


The picture means after Alice pulls changes from Bob, she gets all the commits (read: balls) from Bob's repository.

I've found out that using this simple model of buckets and balls it is possible to explain even quite complex things in a very intuitive way.

In the next post we'll try to use balls and buckets to understand git branches, merge types (regular merge, octopus, cherry-pick), rebase and reset.

понедельник, 12 декабря 2011 г.

Setting up a simple git working environment

To get a feeling of git let's setup an oldschool central-repository schema. This is not a best approach to working with Git, but it is quite a viable one, pretty scalable in terms of team size and very easy to migrate from Svn.

To do this, we'll have to create a shared repository that everybody is going to work with (i.e. push local changes to it and pull changes of other project members) and a local repository that we are going to work with. Git supports several sharing protocols and in case you work in Windows-only environment the simplest one of them is just sharing via windows fileshare. So the idea is just to create "empty" repository, upload it to server and we are ready to go. No soft is needed to install on server side because git natively supports cloning\fetching\pushing over fileshare.


Client side is a bit more complicated to get started with. First of all you'll have to install 'msysgit'. This package contains command-line git toolchain and a minimalistic graphical client -- the Git GUI. Many hardcore programmers use command-line tools only and can't even imagine themselves working with any GUI. And even worse, I have a feeling that Git developers are also quite hardcore and do not even think about GUI. That means all available GUI are quite "third-party" and in general are adding to git problems their own bugs, specifics etc.

I would say that standard Git GUI tends to be unusable for groups of at least two people:
  • the interface is not user-friendly at all, you have to know much about how things are working in git and so on;
  • ofcourse, it is a bit outdated: for example it does not support stash;
  • it has terrible localization that is switched on by default, so if are using localized version of Windows chances that you get it translated in such a way you'll never know what things actually mean;
  • it is written in Tcl\Tk; many programmers nowadays haven't even heard about this language; plus the code is quite obfuscated so that you won't have great time adding your custom menus.
To fight with default localization I've used a simple hack that forces using english localization instead of default one. Create a batch file with following contents:

@set LANG=en
start /D "C:\Program Files\Git\bin" wish.exe "C:\Program Files\Git\libexec\git-core\git-gui"

and then create a link to this batch file on your desktop so that you could now run git client in one click (you can hack even more: if you duplicate pre-installed git desktop shortcut and then edit its properties to point to our newly created batch file, then you'll have the chance to enjoy Git icon instead of default icon for shortcuts to batch files).

Alternatively, you can use Git Cola client, but it is written in Python\Qt and is quite slow on most of operations if your repository contains at least 100 files. You woun't be able so read Git slogan "Git is a fast version control system" without tears while using this client.

You can use command line toolset and it is in fact a good solution for programmers but is totally unacceptable for artists, animators, designers etc.

I'm currently using a proprietary client (SmartGit) which is in general also rather bad, but I believe it is the best client out of all now available. It is written in Java and works on all major operating systems (I've tested on Windows, Mac Snow Leopard and Fedora Linux). It is casual enough for design people to kind of understand how to work with it without big issues (well, it's not totally true -- I'll later describe the problem with pull+discard).

So we've decided with tech: serving git with Windows fileshare and working using a graphical client (SmartGit in my case). Now let's create a new repository. It is noteworthy to say that there are two types of repositories in Git: bare and regular ones. Bare repository is just a database of whole development history with all commits, merges and so on. Regular repository is basically a bare repository plus a working copy (i.e. all the files on disc synchronized to so some commit\date\time).

For our shared repository we want to create a bare repository because having a working copy on server side makes no sense (plus regular repository will reject incoming commits when it is in the same branch you are pushing -- to prevent overwriting history and loosing data).

The easiest way to create bare repository is to use command-line. Create a temp directory, remember a path to this directory, open Git Bash and navigate to your temp directory (do you remember that Windows path like C:\Temp\git-shared will transform into /c/Temp/git-shared when using Git Bash? -- navigate using cd and ls commands). Use this command to create bare repository:

git init --bare

You'll have this output if all ok:

Initialized empty Git repository in d:/xxx/git-shared/

And temp directory will contain something like this:

hooks\
info\
objects\
refs\
config
description

HEAD


You can read much about what those files and directories mean in Git Book. We'll just copy all those files to central server so that it becomes shared to all other woking places via Windows fileshare.

Thats all about server side. Let's start with client side. Following steps mostly depend on what GUI you select to work with, but all you have to do is just to clone shared repository to your local machine. After having done it, you'll end up with regular repository (this means you get not only the latest version like in svn, but also all development history for all files -- thats why you do not have to worry much about backing up git shared repository: your system becomes more stable with each new client as cloning or updating leads to receiving all development history).

You can now edit files in your working copy and push them to shared repository. This way of working with git scales well to many client per one shared repository (but I'll later discuss isues with this approach).

This is all about setting up basic working environment, next post will be about everyday actions: fetch, merge, rebase, branch and switch. Stay tuned.

четверг, 8 декабря 2011 г.

Using git: intro

You can google lots of info/manuals on Git everywhere across the Internet, but casual and easy understandable intros are not yet widerly available so I'll try to make a small contribution here by posting my own simple introduction to Git.

To start using Git, I guess, you have to switch from some other source control system like Subversion, Perforce etc. And that switch is not just about installing new software and migrating your data from one system to another. It is much more: you have to switch your mind from using one development approach to completely different. I believe many things that were very straightforward with Svn tend to become quite complicated with Git and vise versa.

So switching from Svn to Git is a process of figuring out how work processes are transformed to Git world and how can you deal with them.

Git is a decentralized source control system. What does it mean actually? Suppose you use centralized source control such as Subversion, Perforce or Cvs. The word "centralized" means that the development history for all your files is kept on some remote central server everybody uses to perform the majority of operations: to view your changes, to commit them, to merge from other branch and so on. On the other end, "decentralized" word means that the development history is not kept on some remote server but is stored locally by all project users.

Using Git is pretty much like using Svn with server installed locally by all users and synchronizing all those repositories together. So, in Git world commit, diff, merge, log are all local operations that work with your local development history database. The operations to synchronize your local database with some remote database are called pull (to apply changes from remote repository to your local repository) and push (to apply your local changes to remote repository). Those are in fact the only operations that require network. This is the source of Git good performance on regular operations.

In Svn when you make a change, you just run commit and get it published on remote server so that everyone will get it when updating. In Git you also commit the change, but it only becomes stored in local database. To actually publish your changes you'll have to make "push". You can make several commits before actually pushing. You can even do often micro-commits and do not think about spamming your continuos integration system (such systems are often setup to trigger a new build each time a new commit is available in main repository -- so people who are commiting very often are effectively breaking the benefit of building every commit: because of massive small commits the actual bad commit is unlikely to be tested at the time it is uploaded to main repository because it has to wait in queue for a long time)

Does being decentralized bring anything useful? Well, yes.
-- central repositories are slow when syncing from a remote repository that is installed somewhere very far (suppose updating in Portland something that is hosted in Berlin)
-- decentralized means "easy" branching/merging
-- decentralized means you do not break anything when committing because you are commiting locally

First post

Hi!

My name is Anthony and I'm senior programmer working in games industry.

I've been pioneering the usage of Git source control system together with Unity during the last year here at my current place of work and would like to share experience with other developers who are still in doubt whether to switch to Git or not.

So it's going to be organized like a series of blog posts here and today just a small post to start with.